This blog post is written and published on AzureStack.blog: https://azurestack.blog/2016/10/adding-and-using-the-dsc-for-linux-extension-v2-to-azure-stack-tp2/
In the previous post we added the CentOS 7.2 OS Gallery Item and Linux diagnostic VM Extension to the stack.
Because you have already seen the process of adding a VM Extension to Azure Stack, this blog post will focus more on the using aspect of the DSC For Linux VM extension to set the ground for blog posts to come.
In this series:
Adding and using…
- CentOS 7.2 (or any other image) to Azure Stack TP2
- OS Gallery Items to Azure Stack TP2
- The DSC For Linux extension v2 to Azure Stack TP2 (this post)
- DSC For Linux Gallery Item to Azure Stack TP2
- DSC For Linux Azure Automation DSC Gallery Item to Azure Stack TP2
VM Extensions shipped with TP2
Let’s enumerate the VM extension shipped with TP2 by running this script (I assume you already setup the Azure Stack connection in PowerShell).
try {
    [void] $PSDefaultParameterValues.Add("*-AzureRm*:Location","Local")
} catch {}

Get-AzureRmVMImagePublisher | ForEach-Object -Process {
    Get-AzureRmVMExtensionImageType -PublisherName $_.PublisherName | ForEach-Object -Process {
        Get-AzureRmVMExtensionImage -PublisherName $_.PublisherName -Type $_.Type
    }
} | Format-Table -AutoSize -Property PublisherName,Type,Version
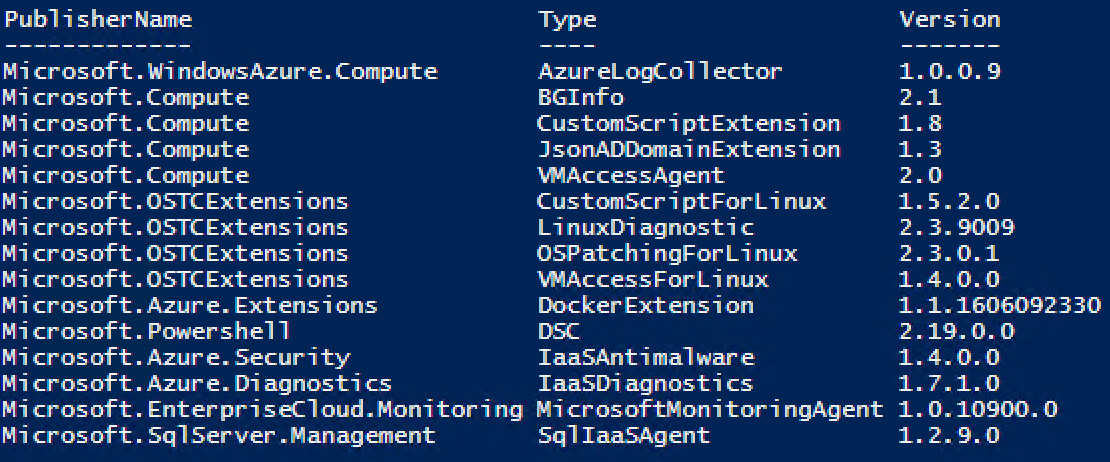
We can see that quit a few VM Extensions are already present plus the Linux Diagnostics one we imported in the previous blog. As you probably already notices, the DSC For Linux extension did not ship with Azure Stack so we need to bring it in ourselves.
Adding the DSC For Linux VM Extension
Again I’ve gone ahead and deployed a VM in public Azure and copied the VM Extension from there to my GitHub account. You can download it here. The Linux VM extensions are openly being develop on GitHub if you’re interested.
After you have downloaded it, we need to place it on the host in the C:\ClusterStorage\Volume1\Shares\SU1_Infrastructure_1\CRP\GuestArtifactRepository directory.
Let’s create a new folder here called: DSCForLinux and copy in the zip file we just downloaded.
Now we need to add a manifest file so this VM extension will be available. Create a file called manifest.json and copy in the following:
{
    "publisher":  "Microsoft.OSTCExtensions",
    "Type":  "DSCForLinux",
    "Version":  "2.0.0.0",
    "GuestArtifact":  {
                          "ExtensionHandlerFilePath":  "Microsoft.OSTCExtensions.DSCForLinux_2.0.0.0.zip",
                          "OsType":  "Linux",
                          "ComputeRole":  "N/A",
                          "VMScaleSetEnabled":  false,
                          "SupportsMultipleExtensions":  false
                      }
}

You can validate if you have added it correctly by running:
Get-AzureRmVMExtensionImage -PublisherName Microsoft.OSTCExtensions -Location local -Type DSCForLinux
If you get output instead of an exception, you’re good to go!

Using the DSC For Linux VM Extension
From the GitHub repository where the DSC For Linux VM Extension is being developed, we can see what the VM Extension expects as inputs to operate.
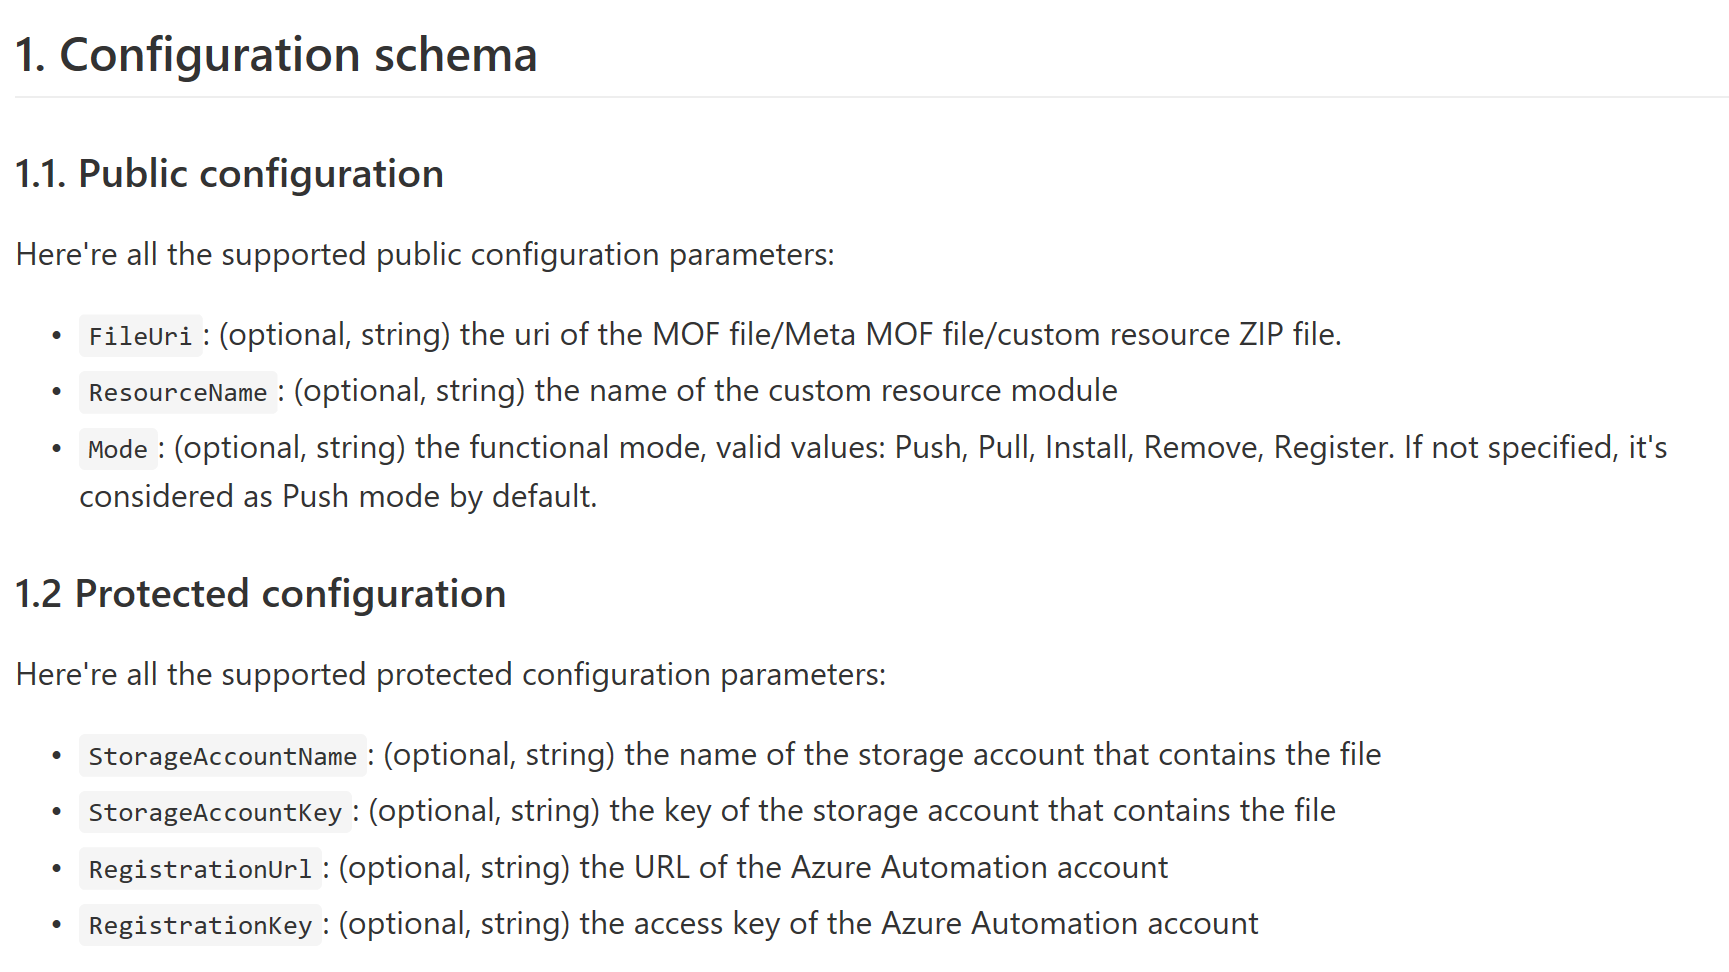
Basically the “Mode” used, dictates what other parameters are required. E.g. Push / Pull mode requires the FileUri to point to a mof (Push) or meta.mof (Pull) file and if your file is on a storage account which is not set to Blob sharing, you can additionally specify the StorageAccountName and Key.
We’ll look at two functionalities of the VM Extension:
- Push (converge from pre-compiled mof)
- Register (onboard into Automation DSC service)
Setting up prerequisites
Because we take some dependencies on external resources, we need to set those up first.
Compiling a mof and making it available
We need to pre-compile a mof file which we will Push to the node. We need to pre-compile a mof because unlike the DSC For Windows VM Extension, the DSC For Linux VM extension cannot consume a configuration script to compile it on the VM.
First let’s install the NX PowerShell module so we have the correct schema files to create a mof for a Linux system from a Windows system.
Install-Module -Name NX -Force
If this is the first time you use PowerShellGet, you will get prompted to download and install the requirements for this to work.
Now we can write and compile the mof file. Let’s look at the configuration script:
Configuration NGINX {
    Import-DSCResource -Module NX
    node 'localhost' {
        nxPackage EPEL {
            Ensure = 'Present'
            Name = 'epel-release'
            PackageManager = 'Yum'
        }

        nxPackage NGINX {
            Ensure = 'Present'
            Name = 'nginx'
            PackageManager = 'Yum'
            DependsOn = '[nxPackage]EPEL'
        }

        nxFile MyCoolWebPage {
            DestinationPath = '/usr/share/nginx/html/index.html'
            Contents = '<center><H1>Hello World!</H1></center>'
            Force = $true
            DependsOn = '[nxPackage]NGINX'
        }

        nxService NGINXService {
            Name = 'nginx'
            Controller = 'systemd'
            Enabled = $true
            State = 'Running'
            DependsOn = '[nxFile]MyCoolWebPage'
        }
    }
}
This configuration will make sure NGINX (among other things, a light weight web server) is installed. Because the default CentOS package repository doesn’t contain the packages needed, the epel-release package will be installed, allowing to get and install packages from the epel repository.
When NGINX is installed, the default website is modified and the NGINX daemon is started.
Please note that this configuration is not compatible with debian based distributions (e.g. Ubuntu) as these use, among other things, different package managers.
Now let’s compile this mof and put it on the storage account.
First run the configuration script, making the configuration available in memory. Then:
NGINX -OutputPath c:\NGINX
Which will compile the localhost.mof file located at c:\NGINX.
Next, we upload the localhost.mof file to the storage account:
$subscriptionid = (Get-AzureRmSubscription -SubscriptionName 'Default Provider Subscription').SubscriptionId
$StorageAccount = Get-AzureRmStorageAccount -ResourceGroupName tenantartifacts -Name tenantartifacts
$DSCContainer = New-AzureStorageContainer -Name dsc -Permission Blob -Context $StorageAccount.Context
$mofUri = $DSCContainer | Set-AzureStorageBlobContent -File C:\NGINX\localhost.mof
$mofUri.ICloudBlob.StorageUri.PrimaryUri.AbsoluteUri
Make a note of the Uri as we need it later on.
Setting up an Automation Account
I’m assuming you will have an Azure subscription and your Azure Stack VMs are capable of communicating with the internet. We are utilizing a hybrid scenario here where Azure Stack VMs get onboarded into Automation DSC.
If you don’t already have an Automation Account, go and set one up. If you need to know more about Azure Automation, go to the Azure documentation about it here.
Now you have your Automation Account. We need the Uri and one of the 2 access keys associated with it.
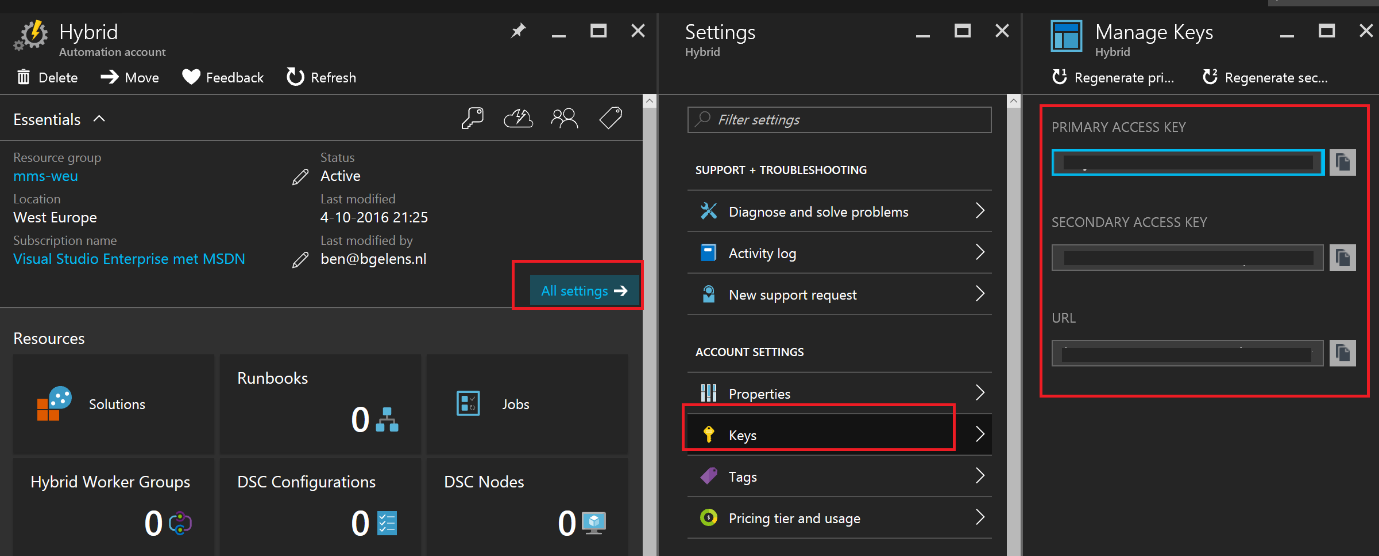
Make a note of these as we need those later on.
Deploy using PowerShell
In this scenario we will deploy a CentOS VM using AzureRm PowerShell cmdlets. The DSC For Linux extension will download the mof file we published on the storage account. As the container has the Blob permission set, we won’t have to specify the storage account name nor key (public Uri).
try {
    [void] $PSDefaultParameterValues.Add("*-AzureRm*:Location","Local")
} catch {}

#provide variable values
$VMName = 'CentOSDsc01'
$RGName = 'CentOSDsc01'
$VNetName = "$RGName-VNET"
$StorageName = $RGName.ToLower() + "storage"
$OSCredential = Get-Credential -Message 'Provide OS Credentials'
#$mofUri = $mofUri.ICloudBlob.StorageUri.PrimaryUri.AbsoluteUri
$mofUri = 'https://tenantartifacts.blob.azurestack.local/dsc/localhost.mof'

#create resource group
$RG = New-AzureRmResourceGroup -Name $RGName

#create storage account
$storageAcc = $RG | New-AzureRmStorageAccount -Name $StorageName -Type Standard_LRS

#create vnet and subnet
$Vnet = $RG | New-AzureRmVirtualNetwork -Name $VNetName -AddressPrefix 10.0.0.0/16 `
    -Subnet (New-AzureRmVirtualNetworkSubnetConfig -Name default -AddressPrefix 10.0.0.0/24)

#create public ip
$pip = $RG | New-AzureRmPublicIpAddress -Name $VMName -AllocationMethod Dynamic

#create nsg including rules
$RuleArgs = @{
    Protocol = 'Tcp'
    Access = 'Allow'
    Direction = 'Inbound'
    DestinationAddressPrefix = '*'
    SourceAddressPrefix = '*'
    SourcePortRange = '*'
}
$NSG = $RG | New-AzureRmNetworkSecurityGroup -Name "$VMName-NSG" -SecurityRules @(
        New-AzureRmNetworkSecurityRuleConfig -Name SSH -DestinationPortRange 22  -Priority 100 @RuleArgs
        New-AzureRmNetworkSecurityRuleConfig -Name HTTP -DestinationPortRange 80 -Priority 102 @RuleArgs
)

#create nic
$nic = $RG | New-AzureRmNetworkInterface -Name "$VMName-NIC" -SubnetId $vnet.Subnets[0].Id -PublicIpAddressId $pip.Id -NetworkSecurityGroupId $NSG.Id

#create vm config
$vm = New-AzureRmVMConfig -VMName $VMName -VMSize Standard_A2
$vm = Set-AzureRmVMOperatingSystem -VM $vm -Linux -ComputerName $VMName -Credential $OSCredential
$vm = Set-AzureRmVMSourceImage -VM $vm -PublisherName OpenLogic -Offer CentOS -Skus 7.2 -Version 'latest'
$vm = Add-AzureRmVMNetworkInterface -VM $vm -Id $nic.Id
$osDiskUri = $storageAcc.PrimaryEndpoints.Blob.ToString() + "vhds/$VMName.vhd"
$vm = Set-AzureRmVMOSDisk -VM $vm -Name $VMName -VhdUri $osDiskUri -CreateOption fromImage

#deploy vm
$RG | New-AzureRmVM -VM $vm

#add vmextension
$ExtensionArgs = @{
    VMName = $VMName
    ResourceGroupName = $RG.ResourceGroupName
    Name = 'DSCForLinux'
    Publisher = 'Microsoft.OSTCExtensions'
    ExtensionType = 'DSCForLinux'
    TypeHandlerVersion = '2.0'
    Settings = @{
        Mode = 'Push'
        FileUri = $mofUri
    }
}
Set-AzureRmVMExtension @ExtensionArgs
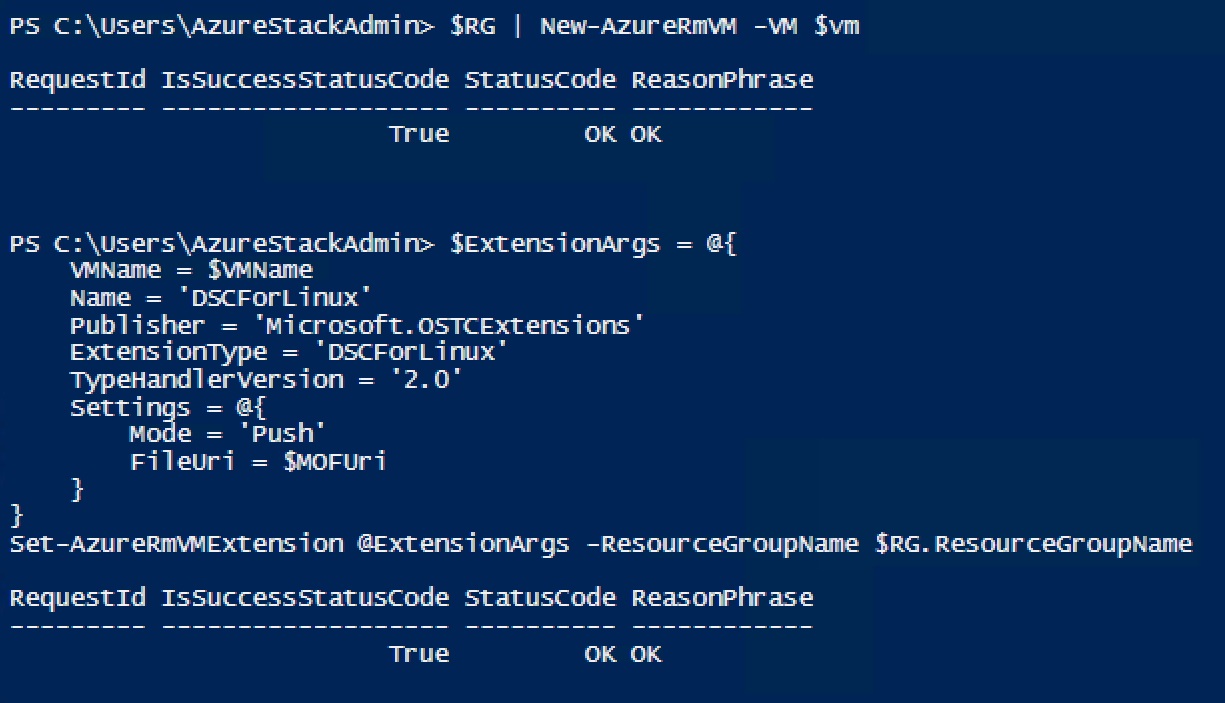
Now the VM is deployed and the DSC For Linux VM Extension was added to it. Let’s check if the mof file was applied. I opened port 80 so we can just connect to the public IP and see if we get a result.
Start-Process iexplore "http://$(($pip | Get-AzureRmPublicIpAddress).IpAddress)"

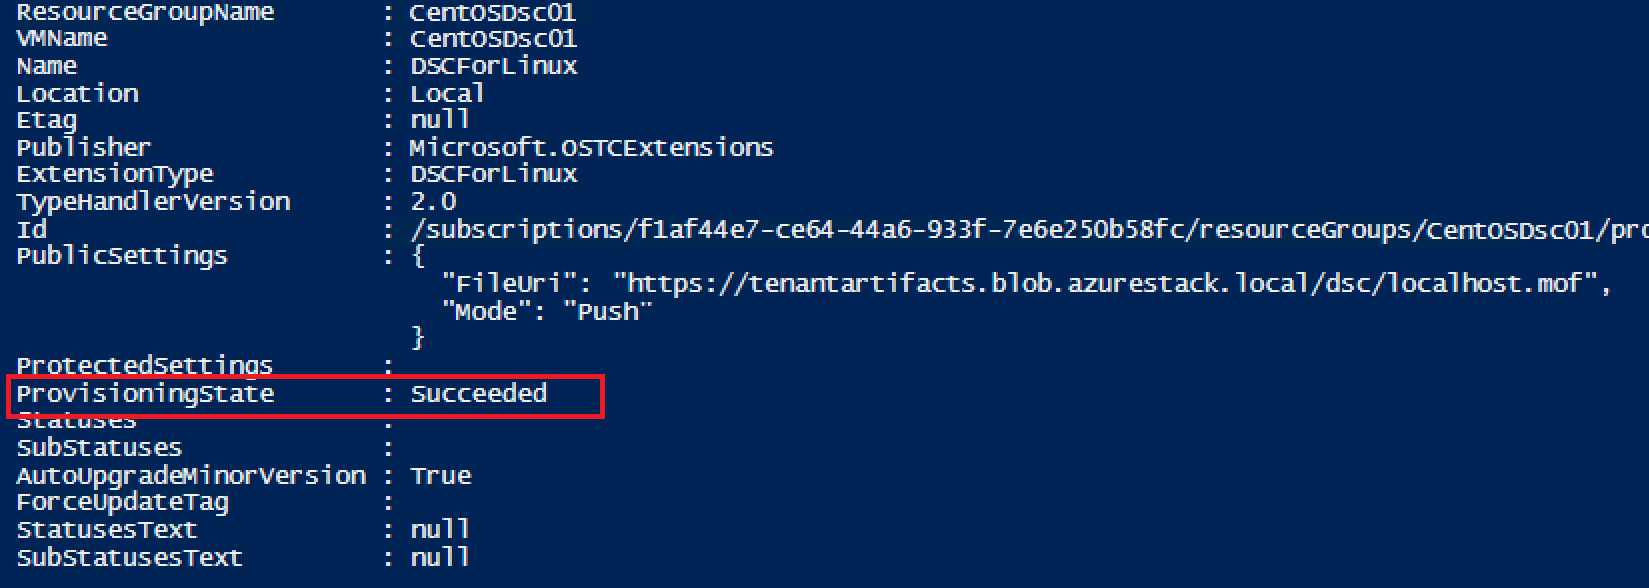
Success, we can also see some status information using:
Get-AzureRmVMExtension -ResourceGroupName $RG.ResourceGroupName -VMName $VM.Name -Name DSCForLinux
Deploy using ARM template
In this scenario we will deploy a CentOS VM using a JSON template. The DSC For Linux extension will register the node to Azure Automation DSC so we need to provide the Automation Uri and one of the access keys. The deployment will be triggered by PowerShell.
Save the following as Deploy.json:
{
    "$schema": "https://schema.management.azure.com/schemas/2015-01-01/deploymentTemplate.json#",
    "contentVersion": "1.0.0.0",
    "parameters": {
        "adminUsername": {
            "type": "string"
        },
        "adminPassword": {
            "type": "securestring"
        },
        "vmName": {
            "type": "string"
        },
        "registrationKey": {
            "type": "securestring",
            "metadata": {
                "description": "Registration key to use to onboard to the Azure Automation DSC pull/reporting server"
            }
        },
        "registrationUrl": {
            "type": "string",
            "metadata": {
                "description": "Registration url of the Azure Automation DSC pull/reporting server"
            }
        }
    },
    "variables": {
        "dnsNameForPublicIP": "[concat('dns', resourceGroup().name)]",
        "imagePublisher": "OpenLogic",
        "imageOffer": "CentOS",
        "imageSku": "7.2",
        "OSDiskName": "osdisk",
        "nicName": "myVnic",
        "addressPrefix": "10.0.0.0/24",
        "subnetName": "mySubnet",
        "subnetPrefix": "10.0.0.0/24",
        "storageAccountName": "[concat('sa', resourceGroup().name)]",
        "storageAccountType": "Standard_LRS",
        "publicIPAddressName": "myPublicIP",
        "publicIPAddressType": "Dynamic",
        "vmStorageAccountContainerName": "vhds",
        "vmSize": "Standard_A2",
        "virtualNetworkName": "myVnet",
        "vnetID": "[resourceId('Microsoft.Network/virtualNetworks',variables('virtualNetworkName'))]",
        "subnetRef": "[concat(variables('vnetID'),'/subnets/',variables('subnetName'))]",
        "networkSecurityGroupName": "[tolower(concat('nsg',uniquestring(resourceGroup().id)))]"
    },
    "resources": [
        {
            "type": "Microsoft.Storage/storageAccounts",
            "name": "[toLower(variables('storageAccountName'))]",
            "apiVersion": "2015-06-15",
            "location": "[resourceGroup().location]",
            "properties": {
                "accountType": "[variables('storageAccountType')]"
            }
        },
        {
            "apiVersion": "2015-06-15",
            "type": "Microsoft.Network/networkSecurityGroups",
            "name": "[variables('networkSecurityGroupName')]",
            "location": "[resourceGroup().location]",
            "properties": {
                "securityRules": [
                    {
                        "name": "ssh",
                        "properties": {
                            "description": "Allow SSH",
                            "protocol": "Tcp",
                            "sourcePortRange": "*",
                            "destinationPortRange": "22",
                            "sourceAddressPrefix": "*",
                            "destinationAddressPrefix": "*",
                            "access": "Allow",
                            "priority": 200,
                            "direction": "Inbound"
                        }
                    }
                ]
            }
        },
        {
            "apiVersion": "2015-06-15",
            "type": "Microsoft.Network/publicIPAddresses",
            "name": "[variables('publicIPAddressName')]",
            "location": "[resourceGroup().location]",
            "properties": {
                "publicIPAllocationMethod": "[variables('publicIPAddressType')]",
                "dnsSettings": {
                    "domainNameLabel": "[variables('dnsNameForPublicIP')]"
                }
            }
        },
        {
            "apiVersion": "2015-06-15",
            "type": "Microsoft.Network/virtualNetworks",
            "name": "[variables('virtualNetworkName')]",
            "location": "[resourceGroup().location]",
            "properties": {
                "addressSpace": {
                    "addressPrefixes": [
                        "[variables('addressPrefix')]"
                    ]
                },
                "subnets": [
                    {
                        "name": "[variables('subnetName')]",
                        "properties": {
                            "addressPrefix": "[variables('subnetPrefix')]"
                        }
                    }
                ]
            }
        },
        {
            "apiVersion": "2015-06-15",
            "type": "Microsoft.Network/networkInterfaces",
            "name": "[variables('nicName')]",
            "location": "[resourceGroup().location]",
            "dependsOn": [
                "[concat('Microsoft.Network/publicIPAddresses/', variables('publicIPAddressName'))]",
                "[concat('Microsoft.Network/virtualNetworks/', variables('virtualNetworkName'))]",
                "[variables('networkSecurityGroupName')]"
            ],
            "properties": {
                "networkSecurityGroup": {
                    "id": "[resourceId('Microsoft.Network/networkSecurityGroups', variables('networkSecurityGroupName'))]"
                },
                "ipConfigurations": [
                    {
                        "name": "ipconfig1",
                        "properties": {
                            "privateIPAllocationMethod": "Dynamic",
                            "publicIPAddress": {
                                "id": "[resourceId('Microsoft.Network/publicIPAddresses',variables('publicIPAddressName'))]"
                            },
                            "subnet": {
                                "id": "[variables('subnetRef')]"
                            }
                        }
                    }
                ]
            }
        },
        {
            "apiVersion": "2015-06-15",
            "type": "Microsoft.Compute/virtualMachines",
            "name": "[parameters('vmName')]",
            "location": "[resourceGroup().location]",
            "dependsOn": [
                "[concat('Microsoft.Storage/storageAccounts/', variables('storageAccountName'))]",
                "[concat('Microsoft.Network/networkInterfaces/', variables('nicName'))]"
            ],
            "properties": {
                "hardwareProfile": {
                    "vmSize": "[variables('vmSize')]"
                },
                "osProfile": {
                    "computerName": "[parameters('vmName')]",
                    "adminUsername": "[parameters('adminUsername')]",
                    "adminPassword": "[parameters('adminPassword')]"
                },
                "storageProfile": {
                    "imageReference": {
                        "publisher": "[variables('imagePublisher')]",
                        "offer": "[variables('imageOffer')]",
                        "sku": "[variables('imageSku')]",
                        "version": "latest"
                    },
                    "osDisk": {
                        "name": "osdisk",
                        "vhd": {
                            "uri": "[concat(reference(concat('Microsoft.Storage/storageAccounts/', variables('storageAccountName')), providers('Microsoft.Storage', 'storageAccounts').apiVersions[0]).primaryEndpoints.blob, variables('vmStorageAccountContainerName'),'/',variables('OSDiskName'),'.vhd')]"
                        },
                        "caching": "ReadWrite",
                        "createOption": "FromImage"
                    }
                },
                "networkProfile": {
                    "networkInterfaces": [
                        {
                            "id": "[resourceId('Microsoft.Network/networkInterfaces',variables('nicName'))]"
                        }
                    ]
                }
            }
        },
        {
            "type": "Microsoft.Compute/virtualMachines/extensions",
            "name": "[concat(parameters('vmName'),'/DSCForLinuxExtension')]",
            "apiVersion": "2015-06-15",
            "location": "[resourceGroup().location]",
            "dependsOn": [
                "[concat('Microsoft.Compute/virtualMachines/', parameters('vmName'))]"
            ],
            "properties": {
                "publisher": "Microsoft.OSTCExtensions",
                "type": "DSCForLinux",
                "typeHandlerVersion": "2.0",
                "protectedSettings": {
                    "RegistrationUrl": "[parameters('registrationUrl')]",
                    "RegistrationKey": "[parameters('registrationKey')]"
                },
                "settings": {
                    "Mode": "Register"
                }
            }
        }
    ],
    "outputs": {
    }
}
You could also paste it in the Template Deployment widget, but in this case we will deploy the template using PowerShell.
try {
    [void] $PSDefaultParameterValues.Add("*-AzureRm*:Location","Local")
} catch {}

#provide variable values
$VMName = 'AADsc01'
$RGName = 'AADsc01'
$OSCredential = Get-Credential -Message 'Provide OS Credentials'
$RegistrationUri = '<enter you Automation Uri>'
$RegistrationKey = Get-Credential -Message 'Provide Automation Key as password' -UserName AutomationAccount
$JsonLocation = '~\Desktop\Deploy.json'

#create RG
$RG = New-AzureRmResourceGroup -Name $RGName

#create deploy arg hashtable
$DeployArgs = @{
    TemplateFile = $JsonLocation
    ResourceGroupName = $RG.ResourceGroupName
    Mode = 'Complete'
    Force = $true
    TemplateParameterObject = @{
        vmName = $VMName
        adminUsername = $OSCredential.UserName
        adminPassword = $OSCredential.Password
        registrationKey = $RegistrationKey.Password
        registrationUrl = $RegistrationUri
    }
}

#deploy
New-AzureRmResourceGroupDeployment @DeployArgs

Let’s look in the Azure Automation Account if things worked as expected:

Deploy using Portal
So now we want to use this VM extension from the Portal. If you browse the Portal and look for the extension, it is simply not there.
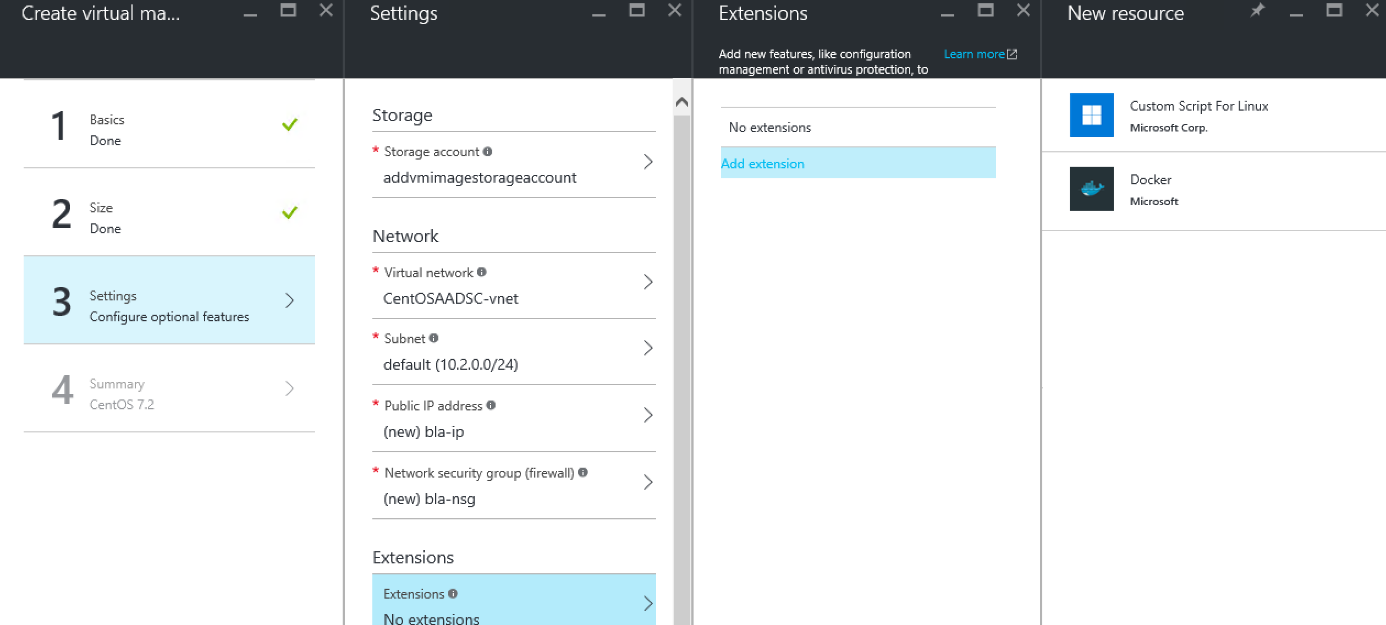
The extension is not provided through the Portal in Public Azure so there are no artifacts created by Microsoft yet.
As with OS Gallery Items, we need to create VM Extension Gallery Items to light them up in the Portal. That will be the topic of the next couple of blogs so stay tuned!
