
This blog post is written and published on AzureStack.blog: https://azurestack.blog/2017/01/creating-an-application-deployment-gallery-item-prerequisites/
In the last series, I created on this site, I showed you how to create Gallery Items for extensions and SimpleVM deployment. In the meantime, I have been looking into what it would take to create a more complex Gallery Item for one of my Azure Stack TAP customers. One that actually deploys and configures something while facilitating user driven customization.
The reason this customer wanted to investigate their options in this area is that they currently have invested heavily in Azure Pack VM Roles which facilitates user driven customization of pre-defined roles like SQL Server, HPC nodes, etc.
I’m happy to say that all the efforts I had to put in reverse engineering and searching through all kind of GitHub repositories and packages on my Azure Stack TP2 node finally paid off. I now have a basic concept on how to do this and I would like to share it with the world!
Welcome to the first blog post (of 2) on this subject. Covering my research as a step by step guide for building an SQL Server 2016 solution exposed as Gallery Item running on Windows Server 2016 Core.
- Part 1 – Prerequisites (this post)
- Part 2 – SQL Gallery item
Breakdown
To create the SQL Gallery solution, we need to break down the deployment process first and then package it up as one Gallery Item with all prerequisites in place.
- Server 2016 Core image
- SQL 2016 install media on publicly accessible blob storage
- DSC configuration archive on publicly accessible blob storage
Once all this is in place, we can start creating the gallery item itself.
OS image
Just like in public Azure, we want to keep things as clean as possible in Azure Stack. Therefore, a generalized (patched) Server 2016 Core OS image is used. This images are not flavored in any sense, which means it will not contain any settings pre-baked. Pre-baking settings results in a lack of transparency and maintainability of these settings and can possibly be the cause of conflict with installation routines not kept in mind. Because this image can be used for multiple purposes, I won’t include any files or packages to help with the SQL installation. In the case of this scenario, we will use a sysprepped / updated image of Windows Server 2016 Standard Core which we will generate directly from the media. If your curious about the latest CU for Windows Server 2016, take a look here.
#ProgresPreference overwrite (impacts performance of IWR)
$CurrentProgressPref = $ProgressPreference
$ProgressPreference = 'SilentlyContinue'
try {
#Download Eval ISO. If link has expired go to https://www.microsoft.com/en-us/evalcenter/evaluate-windows-server-2016 and register to get new link
$IsoIWRArg = @{
Uri = 'http://care.dlservice.microsoft.com/dl/download/1/6/F/16FA20E6-4662-482A-920B-1A45CF5AAE3C/14393.0.160715-1616.RS1_RELEASE_SERVER_EVAL_X64FRE_EN-US.ISO'
OutFile = '~\Desktop\14393.0.16715-1616.RS1_RELEASE_SERVER_EVAL_X64FRE_EN-US.ISO'
UseBasicParsing = $true
}
Invoke-WebRequest @IsoIWRArg
Unblock-File -Path $IsoIWRArg.OutFile
#Download latest CU. In this case Jan 2017 KB3213986
$CUIWRArg = @{
Uri = 'http://download.windowsupdate.com/d/msdownload/update/software/secu/2016/12/windows10.0-kb3213986-x64_a1f5adacc28b56d7728c92e318d6596d9072aec4.msu'
OutFile = '~\Desktop\windows10.0-kb3213986-x64_a1f5adacc28b56d7728c92e318d6596d9072aec4.msu'
UseBasicParsing = $true
}
Invoke-WebRequest @CUIWRArg
Unblock-File -Path $CUIWRArg.OutFile
#expand cab from msu
$expandcab = expand -f:*KB*.cab (Resolve-Path $CUIWRArg.OutFile) (Split-Path (Resolve-Path $CUIWRArg.OutFile))
#Load Convert-WindowsImage from ISO
$mount = Mount-DiskImage -ImagePath (Resolve-Path $IsoIWRArg.OutFile) -PassThru
$DriveLetter = ($mount | Get-Volume).DriveLetter
. $DriveLetter`:\NanoServer\NanoServerImageGenerator\Convert-WindowsImage.ps1
$mount | Dismount-DiskImage
#Create VHD and apply latest CU
$2016CoreParams = @{
SourcePath = (Resolve-Path $IsoIWRArg.OutFile)
VHDFormat = 'vhd'
DiskLayout = 'BIOS'
VHDPath = "$(Resolve-Path ~\Desktop)\Server2016CoreEval.vhd"
Edition = 'Windows Server 2016 SERVERDATACENTERCORE'
SizeBytes = 60GB
RemoteDesktopEnable = $true
Package = $expandcab[3].Split()[1]
}
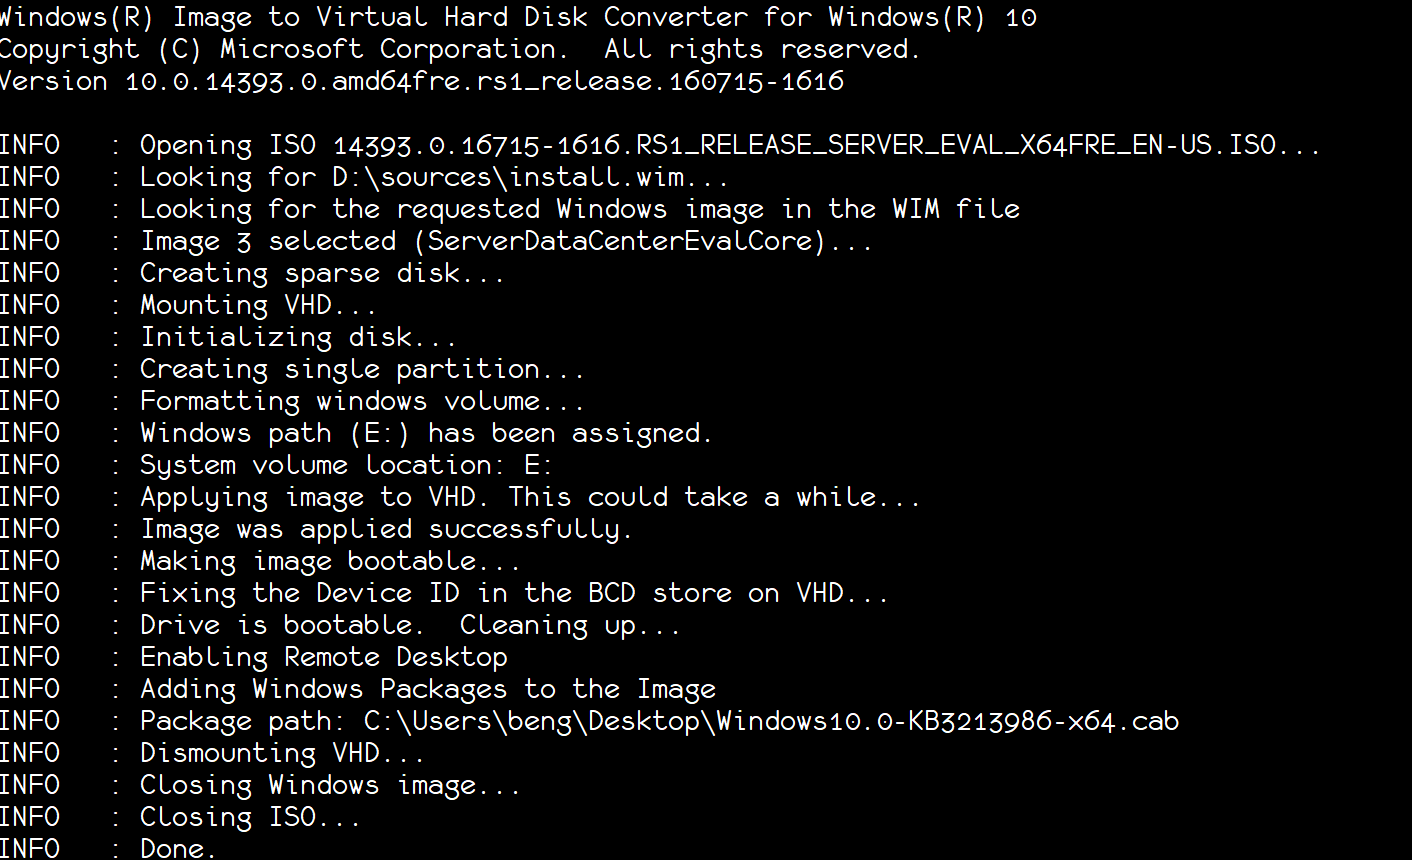
Convert-WindowsImage @2016CoreParams
} finally {
$ProgressPreference = $CurrentProgressPref
}
Note that a vhd is generated and it’s for a Generation1 VM as vhdx and Generation 2 VMs are not supported (yet) in Azure Stack (please upvote here and here!). Also, this script must be run as an Administrator!
The result should look something like this:
Now we have the image we need to make the image available to the Compute Resource Provider (CRP). First, we need to make the image available on a CRP reachable URI. In this case, we will create a storage account and upload the image to it while making it publicly available (once the CRP has added the image to the repository, the storage account could be removed but leave it in place to follow along with the rest of this blog). I’m assuming all prerequisites are already met (AzureRm PowerShell installed and connected with Azure Stack using default provider subscription).
$RG = New-AzureRmResourceGroup -Name tenantartifacts -Location local
$StorageAccount = $RG | New-AzureRmStorageAccount -Name tenantartifacts -Type Standard_LRS
$ImagesContainer = New-AzureStorageContainer -Name image -Permission Blob -Context $StorageAccount.Context
$CoreUpload = $ImagesContainer | Set-AzureStorageBlobContent -File (Resolve-Path ~\Desktop\Server2016CoreEval.vhd)
$CoreUpload.ICloudBlob.Uri.AbsoluteUri | Set-Clipboard
Now we have the URI for our image (on the clipboard), there are 2 “supported” ways of adding it to the CRP repository:
- Via Portal UI
- Via API (using REST, PowerShell cmdlets, etc)
In this case, we will import the image to the CRP using the Portal UI.
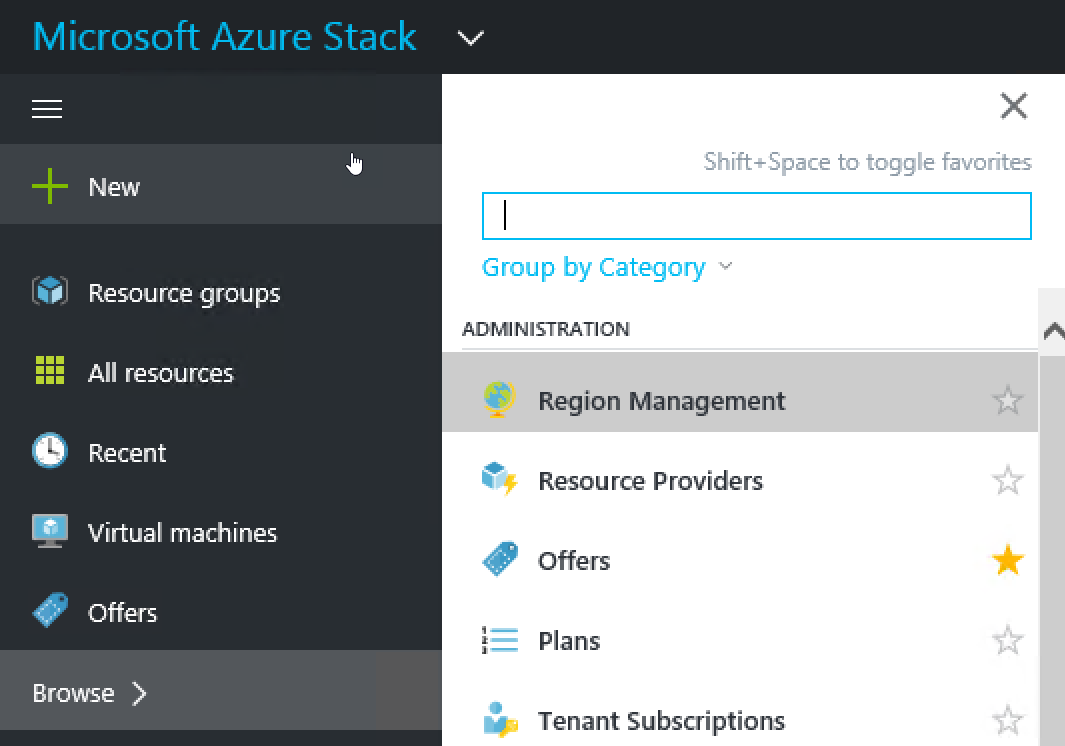
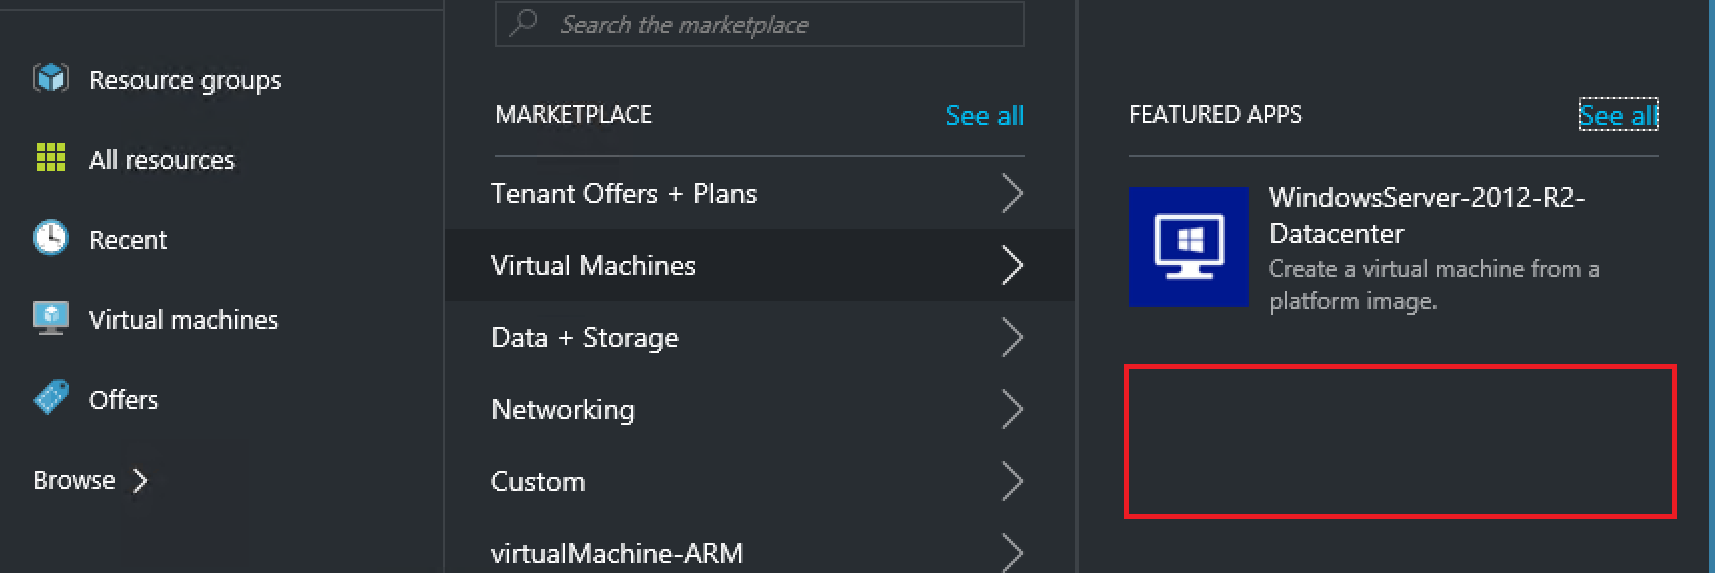
The Portal UI used for adding the images can be accessed via Region Management.
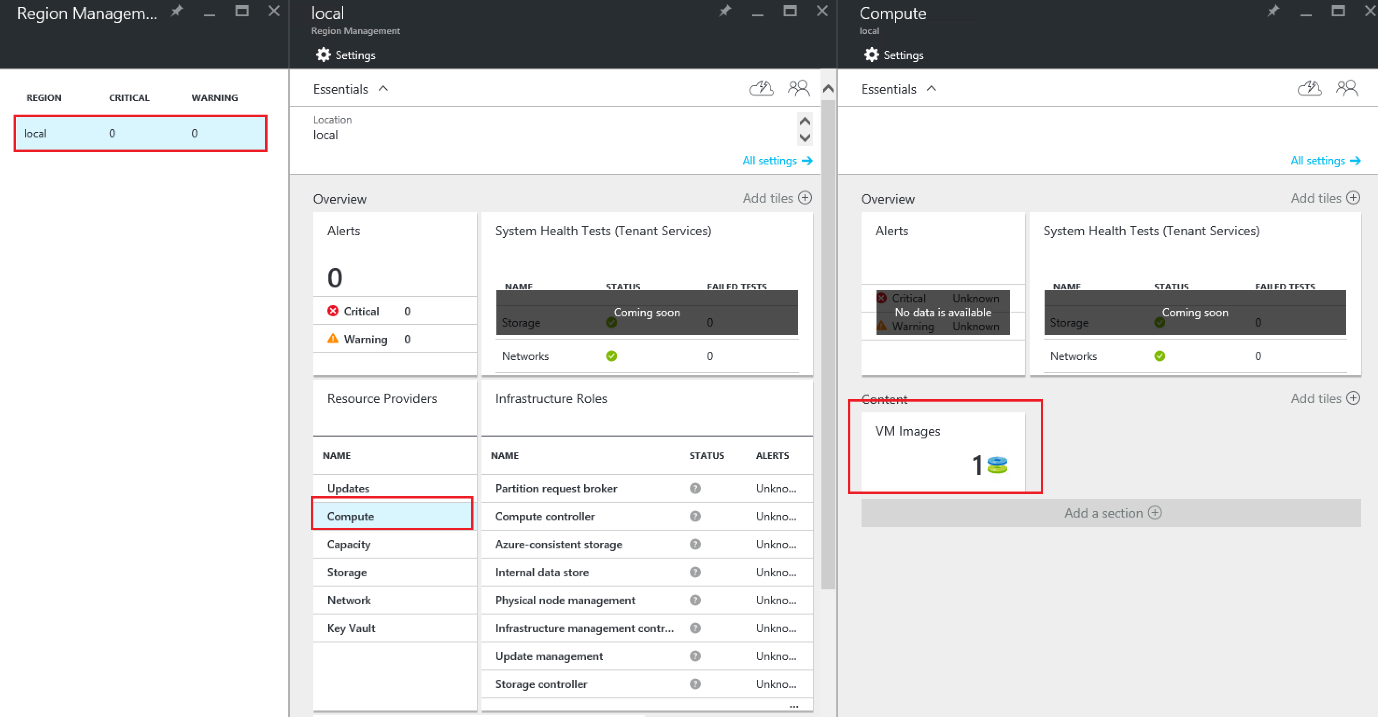
Open the local region blade, and select the Compute Resource Provider. Here you can see the current amount of VM Images for this region.
When you select the VM Images tile, another blade will open which shows you the details of the VM Images currently available. It also allows you to add or remove images.
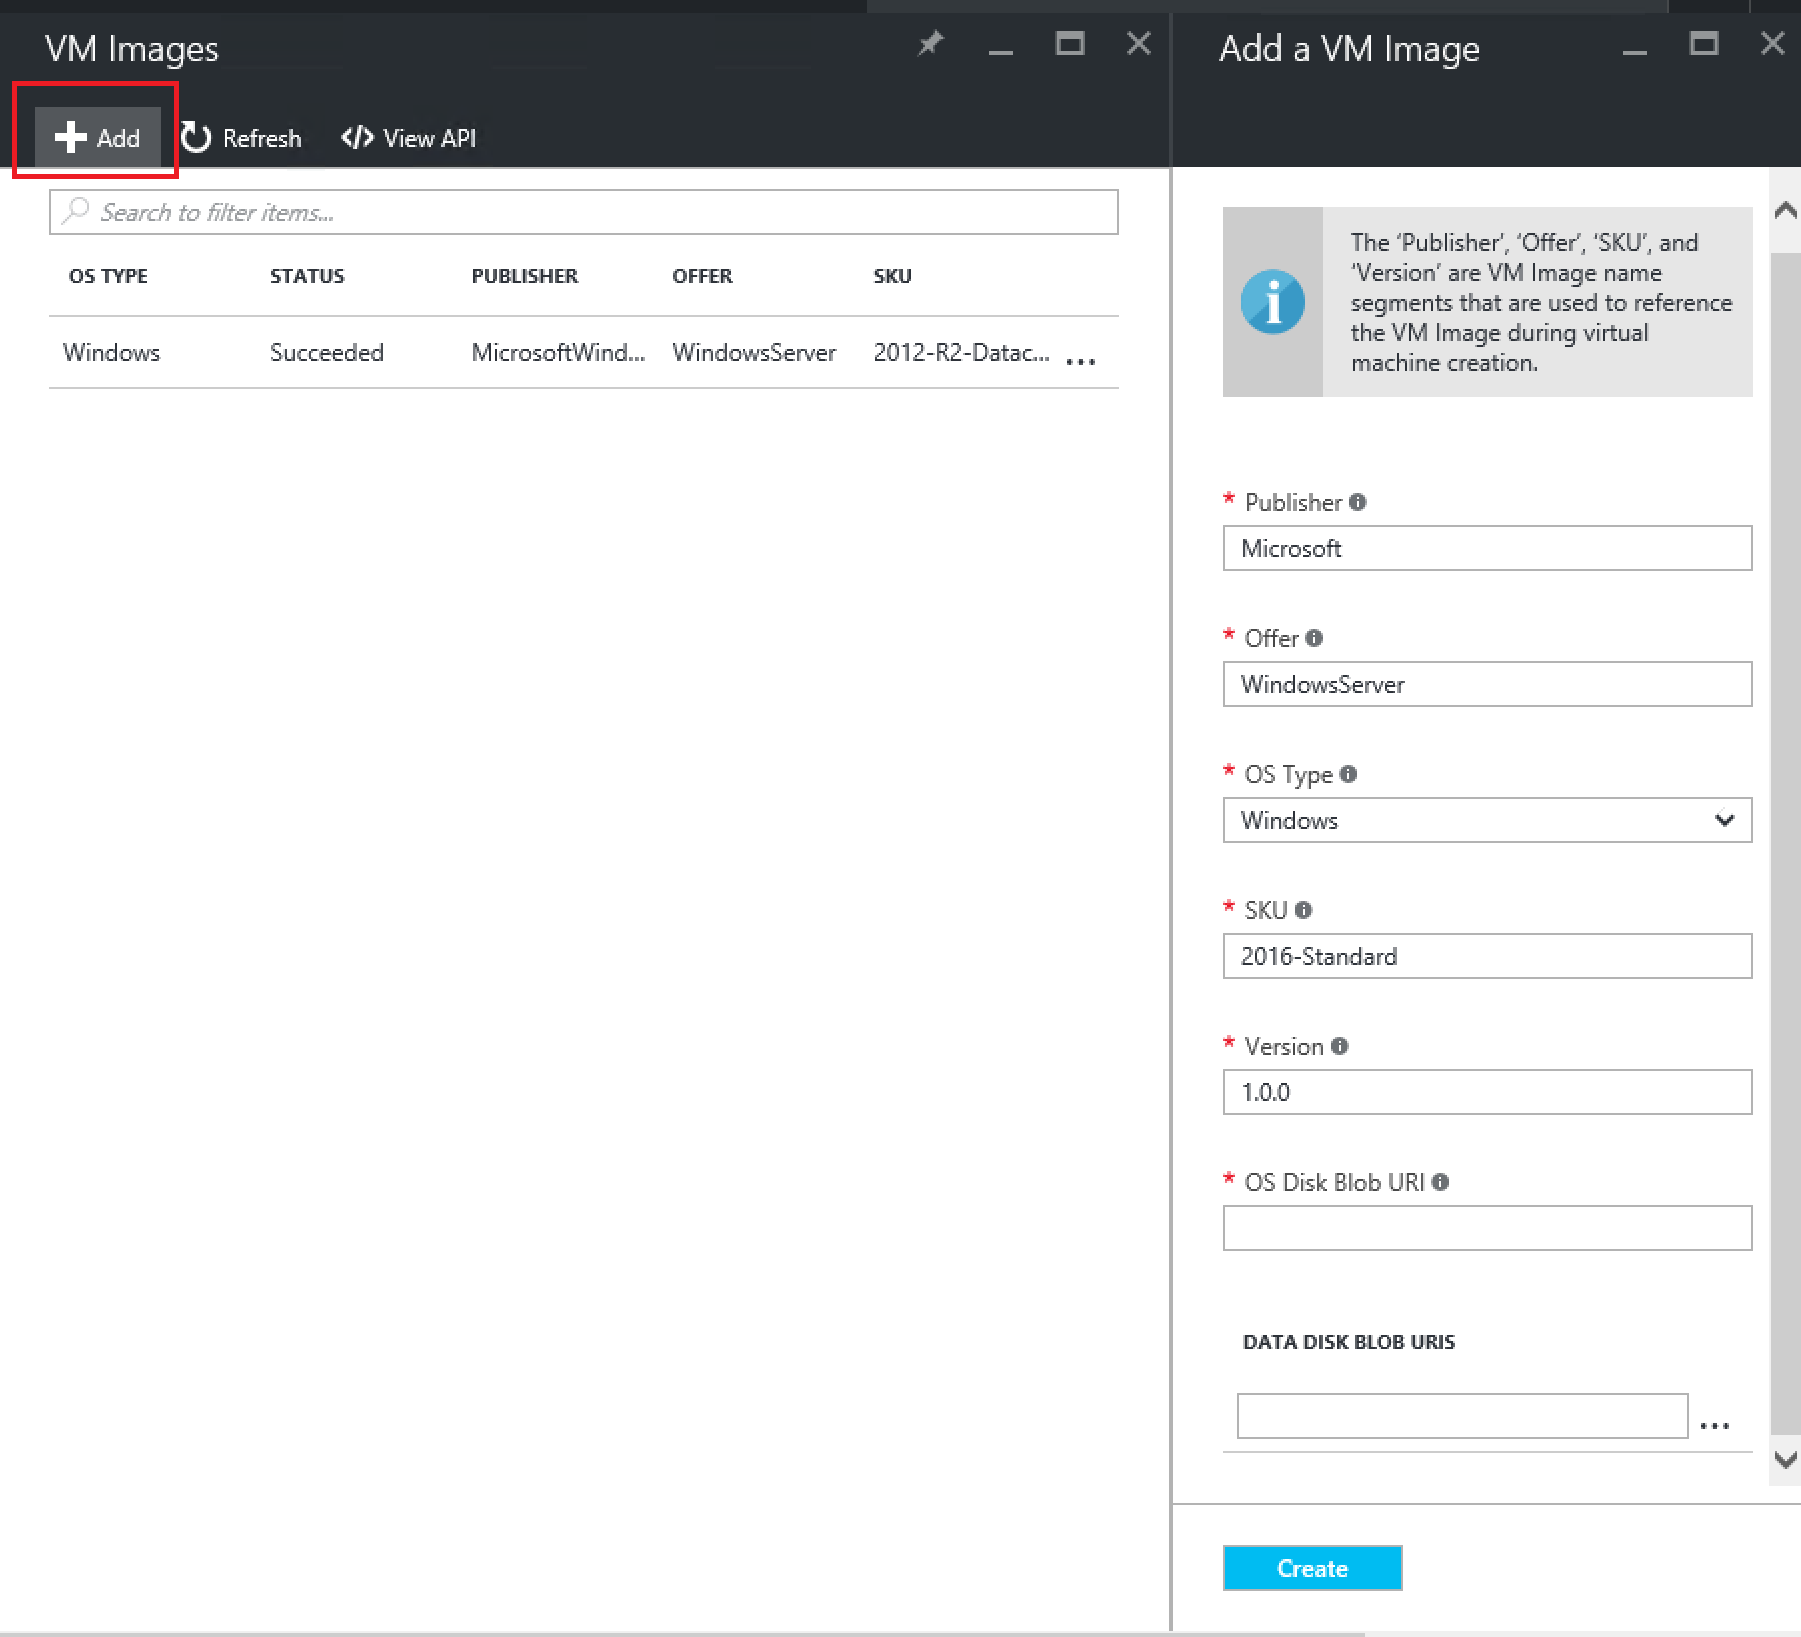
As you can see, adding an image can only be done when the vhd is available on a URI.
Fill out the form as follows and hit create:
| Field | Value |
|---|---|
| Publisher | Microsoft |
| Offer | WindowsServer |
| OS Type | Windows |
| SKU | 2016-Standard-Core |
| Version | 1.0.0 |
| OS Disk Blob URI | https://tenantartifacts.blob.azurestack.local/image/Server2016CoreEval.vhd |
| Data Disk Blob URIs |
The CRP is now downloading the image and making it available.
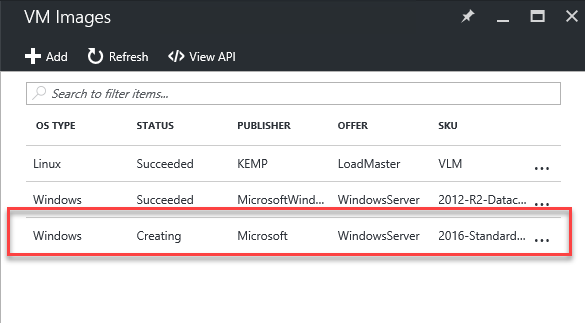
Hit refresh until the status changes.
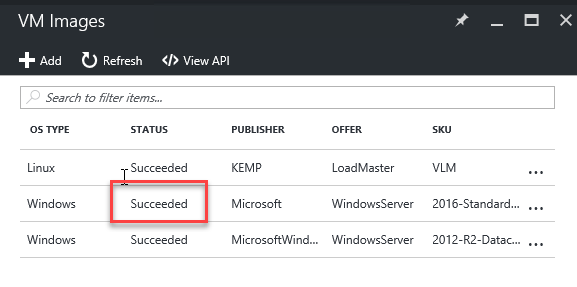
Once the status equals Succeeded, you can validate if the OS Image is deployable through PowerShell.
The image is not surfaced in the portal as there is no Gallery Item created for it.

If you want to know how to create a simple VM gallery item to deploy this Server 2016 Core image, please look at my previous blog post here.
SQL installation source files
One of the challenges with deploying to (Hybrid) Cloud environments is where to get your installation source files from. In public Azure, most source files are downloaded during deployment from their respective http links. SQL Server Gallery Items in Azure have their own OS images containing the SQL source files (I don’t like this approach as now you need multiple Server images which basically are the same with the exception of the installation source files).
In my opinion, it would be best to have a decent uniform package delivery mechanism in place like chocolatey (a nuget extension) which is http(s) based. For now, however, I’m uploading the SQL 2016 ISO file to a storage account and making it publicly accessible.
I downloaded the evaluation ISO of SQL 2016 with SP1 from here.
Now I have the ISO available, it’s time to make it available on the storage account.
$StorageAccount = Get-AzureRmStorageAccount -ResourceGroupName tenantartifacts -Name tenantartifacts
$ISOContainer = New-AzureStorageContainer -Name iso -Permission Blob -Context $StorageAccount.Context
$SQL2016Sp1Iso = $ISOContainer | Set-AzureStorageBlobContent -File (Resolve-Path ~\Desktop\SQLServer2016SP1-FullSlipstream-x64-ENU.iso)
$SQL2016Sp1Iso.ICloudBlob.Uri.AbsoluteUri | Set-Clipboard
The resulting publicly available Uri would be: https://tenantartifacts.blob.azurestack.local/iso/SQLServer2016SP1-FullSlipstream-x64-ENU.iso
DSC Configuration
In Windows VM configuration on Azure is typically handled by Desired State Configuration (DSC). DSC, like ARM, is idempotent which makes it a good fit. A DSC VM Extension is available out of the box with TP2 (although an older version then currently available) to handle DSC configurations which we will leverage. The resulting artefact will be put on a storage account.
What the DSC configuration needs to do:
- Download the ISO from the storage account
- Based on parameter input, install requested SQL server features (SQLEngine and / or IS)
- Configure default or named instance
- Based on parameter input, configure remote tcp port for SQL
For this blog post, we will keep configurable options limited. A mandatory SQL Data disk and Log disk will be created and the user will only be able to define the size per individual disk.
The configuration script:
configuration SQLConfiguration {
    param (
        [Parameter()]
        [ValidateNotNullOrEmpty()]
        [System.String] $SqlInstallationISOUri = 'https://tenantartifacts.blob.azurestack.local/iso/SQLServer2016SP1-FullSlipstream-x64-ENU.iso',

        [Parameter()]
        [ValidateNotNullOrEmpty()]
        [System.String] $SQLInstanceName = 'MSSQLSERVER',

        [Parameter()]
        [System.String[]] $Features = 'SQLENGINE',

        [Parameter(Mandatory)]
        [pscredential] $SetupCredentials,

        [Parameter()]
        [ValidateSet('Windows','SQL')]
        [System.String] $SecurityMode = 'SQL',

        [Parameter()]
        [System.String] $ProductId = [System.String]::Empty,

        [Parameter()]
        [Uint16] $Port = 1433
    )

    $NormalizedFeatures = foreach ($F in $Features) {
        $F.ToUpper().Trim()
    }
    $NormalizedFeatures = $NormalizedFeatures -join ','

    Import-DscResource -ModuleName PSDesiredStateConfiguration -ModuleVersion 1.1
    Import-DscResource -ModuleName xSQLServer -ModuleVersion 3.0.0.0
    Import-DscResource -ModuleName xNetworking -ModuleVersion 3.0.0.0
    Import-DscResource -ModuleName xDownloadISO -ModuleVersion 1.0
    Import-DscResource -ModuleName xStorage -ModuleVersion 2.8.0.0

    Node localhost {
        xDownloadISO DownloadSQL {
            SourcePath = $SqlInstallationISOUri
            DestinationDirectoryPath = 'C:\SQL2016'
        }

        xDisk SqlDataDisk {
            DiskNumber = 1
            FSFormat = 'NTFS'
            DriveLetter = 'G'
            FSLabel = 'SQLData'
        }

        xDisk SqlLogDisk {
            DiskNumber = 2
            FSFormat = 'NTFS'
            DriveLetter = 'I'
            FSLabel = 'SQLLog'
        }

        if ($Features -contains 'SQLENGINE') {
            xSQLServerSetup SQLInstall {
                SourcePath = 'C:'
                SourceFolder = '\SQL2016'
                Features = $NormalizedFeatures
                InstanceName = $SQLInstanceName
                SetupCredential = $SetupCredentials
                SecurityMode = $SecurityMode
                SAPwd = $SetupCredentials
                PID = $ProductId
                SQLSysAdminAccounts = 'Administrators'
                SQLUserDBDir = 'G:\Microsoft SQL Server\Data'
                SQLUserDBLogDir = 'I:\Microsoft SQL Server\Log'
                SQLTempDBDir = 'G:\Microsoft SQL Server\Data'
                SQLTempDBLogDir = 'I:\Microsoft SQL Server\Log'
                SQLBackupDir = 'G:\Microsoft SQL Server\Data'
                DependsOn = '[xDownloadISO]DownloadSQL','[xDisk]SqlDataDisk','[xDisk]SqlLogDisk'
            }
        } else {
            xSQLServerSetup SQLInstall {
                SourcePath = 'C:'
                SourceFolder = '\SQL2016'
                Features = $NormalizedFeatures
                InstanceName = $SQLInstanceName
                SetupCredential = $SetupCredentials
                SecurityMode = $SecurityMode
                SAPwd = $SetupCredentials
                PID = $ProductId
                SQLSysAdminAccounts = 'Administrators'
                DependsOn = '[xDownloadISO]DownloadSQL'
            }
        }

        if ($SecurityMode -eq 'SQL') {
            xSQLServerLogin SQLLogin {
                Ensure = 'Present'
                LoginType = 'SqlLogin'
                SQLInstanceName = $SQLInstanceName
                Name = $SetupCredentials.UserName
                SQLServer = 'localhost'
                LoginCredential = $SetupCredentials
            }
        }

        xSQLServerNetwork SQLTCP {
            InstanceName = $SQLInstanceName
            ProtocolName = 'tcp'
            IsEnabled = $true
            TCPPort = $Port
            RestartService = $true
            DependsOn = '[xSQLServerSetup]SQLInstall'
        }

        xFirewall SQLTCP {
            Name = 'SQL TCP Allow Inbound'
            Ensure = 'Present'
            Enabled = 'True'
            Action = 'Allow'
            Direction = 'Inbound'
            Profile = 'Private'
            LocalPort = $Port
            Protocol = 'Tcp'
        }

        xNetConnectionProfile PrivateProfile {
            InterfaceAlias = 'Ethernet'
            NetworkCategory = 'Private'
        }

        LocalConfigurationManager {
            RebootNodeIfNeeded = $true
        }
    }
}
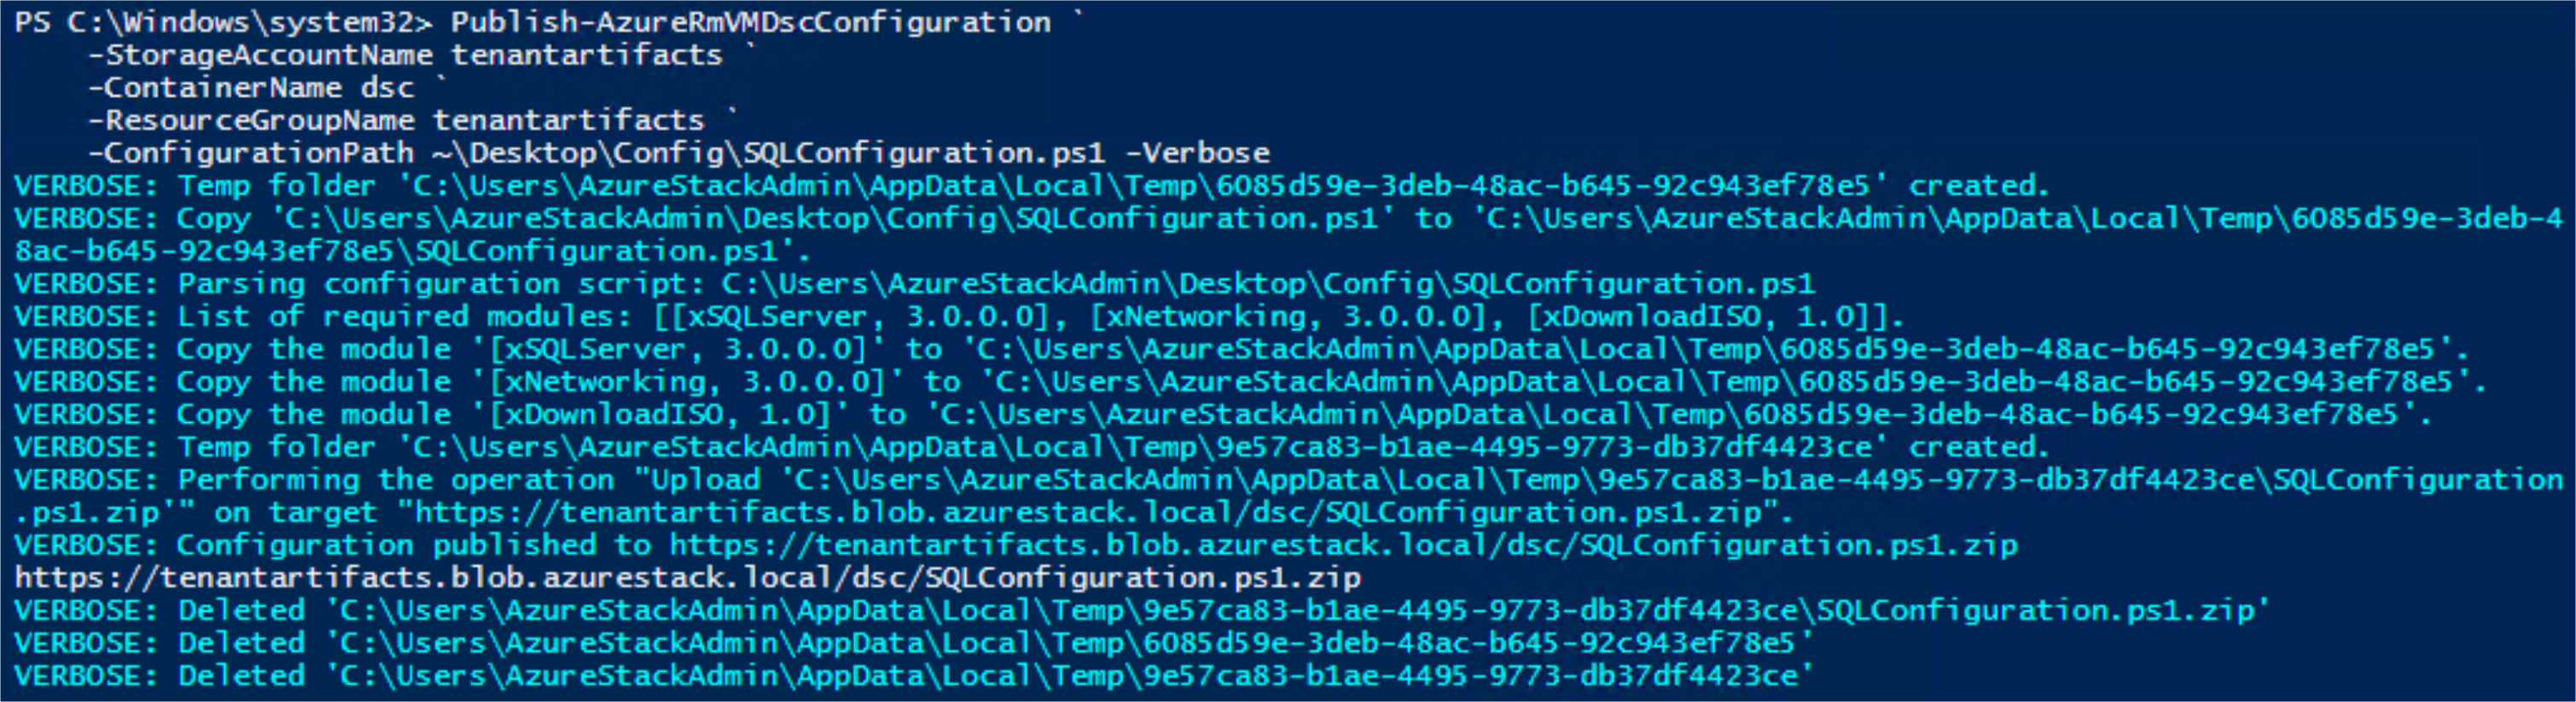
Now we have the configuration in place, we need to make it available as a published DSC Configuration Archive. To do this, we will leverage the Publish-AzureRmVMDscConfiguration cmdlet and target the storage account we have been using already. This cmdlet generates an archive with ps1.zip extension and is able to publish it to the storage account directly or have the result saved to disk instead. On the system you run the cmdlet, all modules imported into the configuration script using the Import-DscResource keyword, need to be in place already with the correct version number. You can download the resources from the PowerShell gallery with exception of the xDownloadISO resource module which comes from the SQL Resource Provider. To make things easy for you, I’ve uploaded the script and the modules to a GitHub repository to go with this blog series.
Let’s look at the result of calling the cmdlet with saving the result on disk in the first place so we can examine the content.

As you can see from the verbose output, the DSC resource modules are packaged together with the configuration script. The VM DSC extension will extract the archive and install these resource modules.
We can now publish the resulting archive ourselves or run the cmdlet again but this time with the parameters to send the archive to a storage account instead of local disk.
Publish-AzureRmVMDscConfiguration `
    -StorageAccountName tenantartifacts `
    -ContainerName dsc `
    -ResourceGroupName tenantartifacts `
    -ConfigurationPath C:\Users\ben-g\Desktop\SQLConfiguration.ps1 `
    -Verbose
The archive is now available on the uri: https://tenantartifacts.blob.azurestack.local/dsc/SQLConfiguration.ps1.zip
All we need to do now is make this container publicly available (Remember the end goal is a Gallery Item available to anyone using the Portal. Don’t store secret or company other specifics within the configuration!).
$StorageAccount = Get-AzureRmStorageAccount -ResourceGroupName tenantartifacts -Name tenantartifacts
$dsccontainer = Get-AzureStorageContainer -Context $StorageAccount.Context -Name dsc
$dsccontainer | Set-AzureStorageContainerAcl -Permission Blob
$dsccontainer | Get-AzureStorageContainerAcl

Quick validation
If you already have a deployed VM available, use the following snippet to quickly test the foundational blocks we have put into place. (For Server 2012 VM, make sure .net 4.6.2 is already installed before trying).
$VMName = 'MyVM'
$ResourceGroupName = 'MyRG'
$VMCredentials = Get-Credential -Message 'Enter Local Admin credentials'
Set-AzureRmVMExtension `
    -Publisher 'Microsoft.Powershell' `
    -ExtensionType 'DSC' `
    -ExtensionName 'DSCConfig' `
    -TypeHandlerVersion 2.19 `
    -VMName $VMName `
    -ResourceGroupName $ResourceGroupName `
    -Location local `
    -Settings @{
        configuration = @{
            url = 'https://tenantartifacts.blob.azurestack.local/dsc/SQLConfiguration.ps1.zip'
            script = 'SQLConfiguration.ps1'
            function = 'SQLConfiguration'
        }
        configurationArguments = @{
            Port = 1433
        }
    } `
    -ProtectedSettings @{
        configurationArguments = @{
            SetupCredentials = @{
                userName = $VMCredentials.UserName
                password = $VMCredentials.GetNetworkCredential().password
            }
        }
    }
Now all prerequisites are in place, we can start creating the Gallery Item which will be the subject of the next blog post. Stay tuned!