
This blog post is written and published on Hyper-V.nu: http://hyper-v.nu/archives/bgelens/2015/02/integrating-vm-role-with-desired-state-configuration-part-7-creating-a-configuration-document-with-encrypted-content/
Series Index:
- Introduction and Scenario
- PKI
- Creating the VM Role (step 1 and 2)
- Pull Server
- Resource Kit
- PFX Repository Website
- Creating a configuration document with encrypted content
- Create, deploy and validate the final VM Role
- Create a Domain Join DSC resource
- Closing notes
In this post the certificate files used for the configuration document encryption are created. Also an example configuration will be created which will have encrypted sensitive data.
Issue with CNG generated keys
While testing out which certificate template settings would do the job intended for this blog post, I stumbled upon an interesting finding (bug?). Apparently the LCM uses .NET methods for accessing certificate keys. When the certificate keys are generated using the Certificate Next Generation API (see: https://technet.microsoft.com/en-us/library/cc730763(v=ws.10).aspx) the private key is not accessible for the LCM. It is also not visible when using the PowerShell Cert PS Drive.
I searched the internet and found an interesting blog which I think explains the issue. The blog can be found here: http://blogs.msdn.com/b/alejacma/archive/2009/12/22/invalid-provider-type-specified-error-when-accessing-x509certificate2-privatekey.aspx.
The blog post writes:
CRYPT_ACQUIRE_ALLOW_NCRYPT_KEY_FLAG This function will attempt to obtain the key by using CryptoAPI. If that fails, this function will attempt to obtain the key by using the Cryptography API: Next Generation (CNG). The pdwKeySpec variable receives the CERT_NCRYPT_KEY_SPEC flag if CNG is used to obtain the key. … pdwKeySpec [out] CERT_NCRYPT_KEY_SPEC The key is a CNG key. “ .NET is not CNG aware yet (at least up to version 3.5 SP1). It uses CryptAcquireContext instead of CryptAcquireCertificatePrivateKey and CryptAcquireContext has no flags to deal with >CNG. A possible workaround to this may be to use CryptoAPI/CNG API directly to deal with CNG keys.
Apparently the issue persisted in .NET 4+. Let’s look at the differences.
When using a legacy cryptographic service provider (CSP), the private key is discovered and represented when enumerated through the certificate PSDrive.
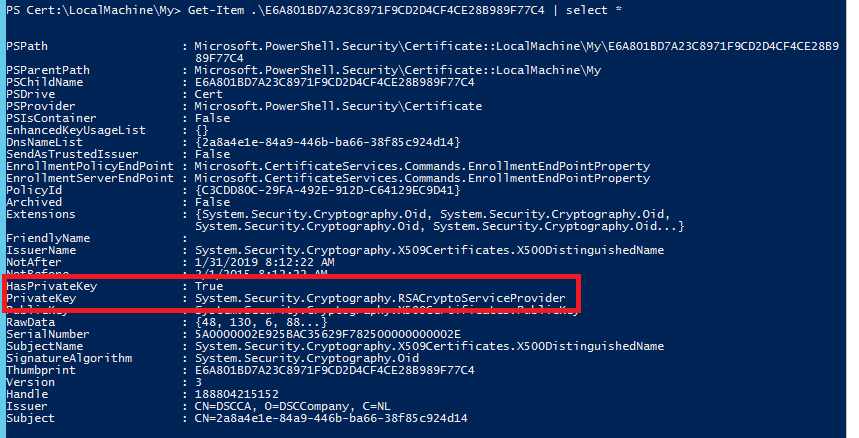
When the LCM needs it, it is accessible.

When a CNG provider is used instead, the certificate PSDrive does show a key is present but does not discover and enumerates it.
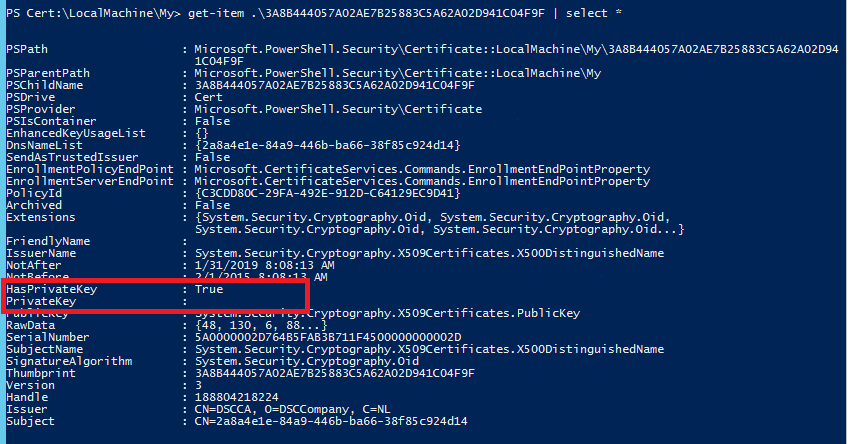
When the LCM needs it, it is not accessible.

I reported this as a bug on connect. If you find this important, please vote it up: https://connect.microsoft.com/PowerShell/feedback/details/1110885/private-key-not-accessible-for-dsc-lcm-when-key-is-generated-using-cng-instead-of-legacy-csp
Create Certificate Template
Now we know about the issue with CNG based certificate keys, we need to create a certificate template which is suitable for encrypting the sensitive data in configuration documents and is compatible for being used by the LCM.
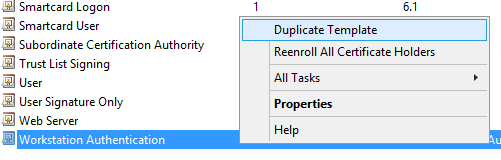
First open the Certificate Templates Console by typing certtmpl.msc. Then select the “Workstation Authentication” template and create a duplicate.
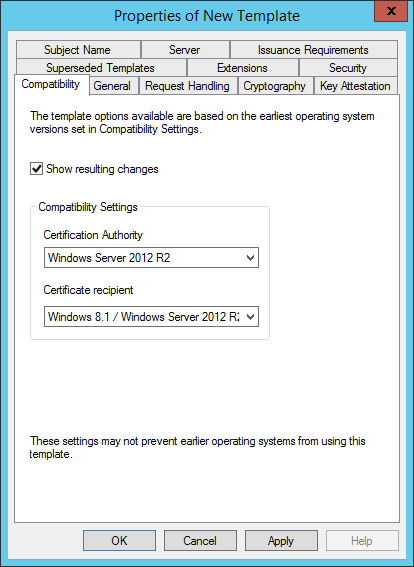
Change the compatibility settings for Certificate Authority and Recipient to Windows Server 2012 R2.
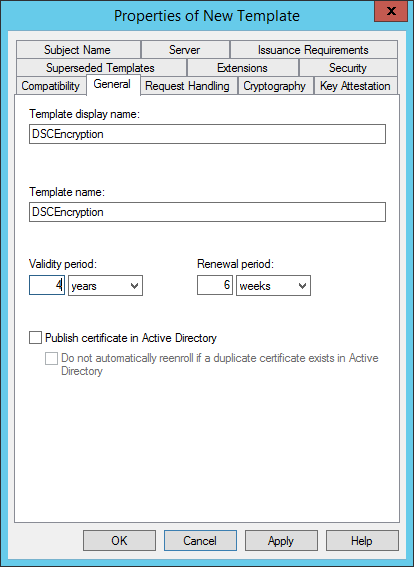
On the General tab give the template a meaningful name. This name will be used later on by the client to request the certificate. Configure the validity period (I choose 4 years as it is configured as the maximum allowed validity period for the CA during the CA setup).
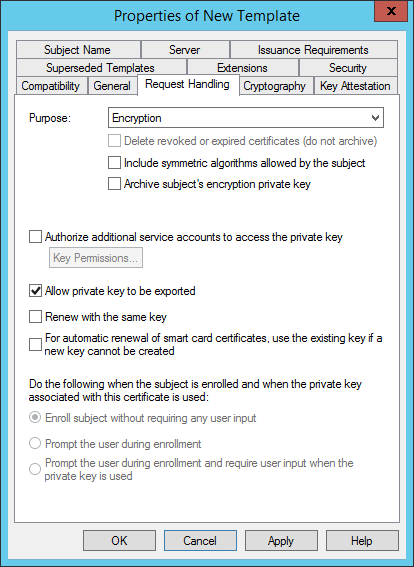
On the Request Handling tab change the purpose to Encryption. This will better prevent the Certificate for being used for other purposes then its intended purpose (e.g. this certificate should only be used for encryption purposes and not for authentication).
Select the Allow private key to be exported checkbox as we need to request certificates and them export them to PFX.
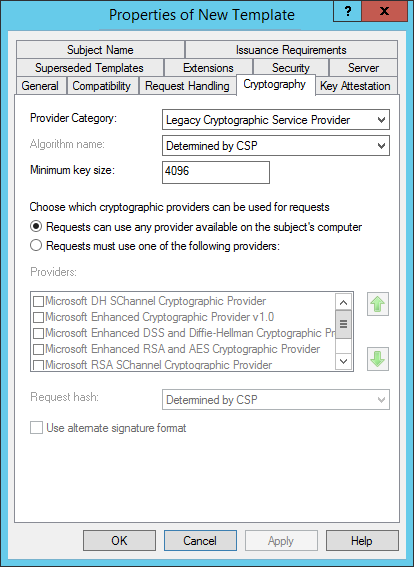
On the Crypthography tab:
- Change the Provider Category to Legacy Cryptographic Service Provider, Determined by CSP.
- Set the minimum key size to 4096
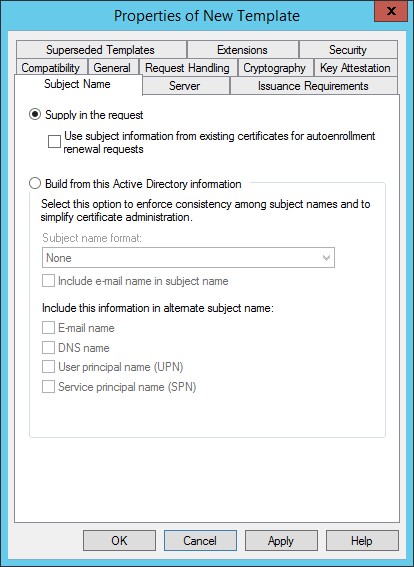
On the Subject Name tab select Supply in the request.
On the Extensions Tab select Application Policies. Click edit and remove Client Authentication.
(The Key Usage is configured correctly automatically for Key Encipherment).

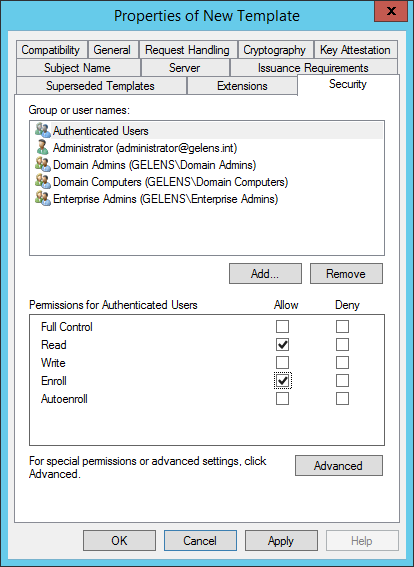
On the Security tab select Authenticated Users and Allow the Enroll permission. (In a real world environment, you should of course restrict this to a group of users so only those who are tasked with generating configurations can enroll new certificates)
Now the template is finished. Select OK.
Add Certificate Template to Templates to Issue
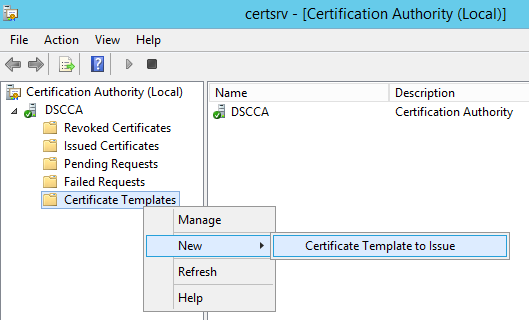
Open the Certificate Authority console by typing certsrv.msc.
Navigate to the Certificate Template node, right click it and select New -> Certificate Template to Issue.
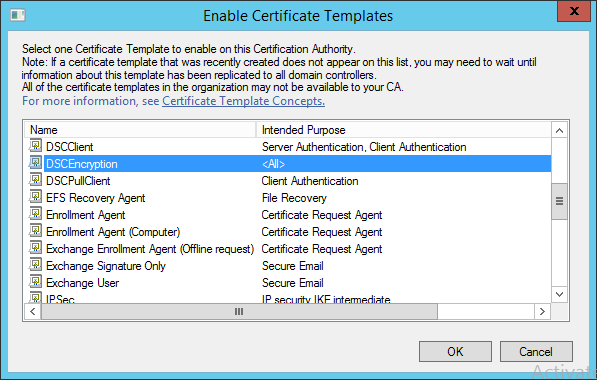
Select the Certificate template which was created earlier and press OK.
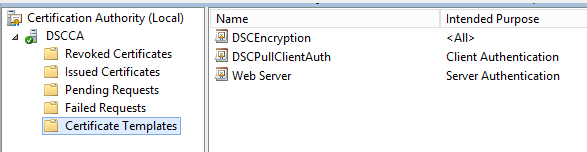
Now 3 templates are available for the CA to issue.
PFX Creation script
Now everything is in place to start generating PFX files which will contain the cryptography keys coupled to the DSC configuration Ids. I created a little script to handle this process itself. Let’s have a look:
#region variables
$GUID = [System.Guid]::NewGuid().guid
#GUID = '44d217e8-c0c3-45b4-ada5-3d9e2a8955f4'
$WebEnrollURL = 'https://webenroll.hyperv.nu/ADPolicyProvider_CEP_UsernamePassword/service.svc/CEP'
$WebEnrollCred = Get-Credential -Message 'Enter Credentials valid for certificate requests'
$Template = 'DSCEncryption'
$PFXPath = 'C:\PFXSite'
$CERPath = 'C:\PublicCerts'
$PFXPwd = ([char[]](Get-Random -Input $(48..57 + 65..90 + 97..122) -Count 12)) -join ""
$SecPFXPwd = $PFXPwd | ConvertTo-SecureString -AsPlainText -Force
#endregion variables

#region logic
try
{
    Write-Verbose -Message "Requesting certificate from template: $Template at URI: $WebEnrollURL" -Verbose
    $cert = Get-Certificate -Url $WebEnrollURL -Template $Template -SubjectName "CN=$GUID" -CertStoreLocation Cert:\LocalMachine\My -Credential $WebEnrollCred -ErrorAction Stop
    Write-Verbose -Message "Succesfully requested certificate"
}
catch
{
    throw "Certificate Request failed"
}
Write-Verbose -Message "Exporting certificate with Private and Public Key to PFX at path: $PFXPath" -Verbose
Export-PfxCertificate -Cert $cert.Certificate.PSPath -Password $SecPFXPwd -FilePath "$PFXPath\$($cert.Certificate.Subject.TrimStart('CN=')).pfx" -ChainOption EndEntityCertOnly -Force | Out-Null
$PFXPwd | Out-File -FilePath "$PFXPath\$($cert.Certificate.Subject.TrimStart('CN=')).txt"

Write-Verbose -Message "Exporting Certificate with Public key to cer file at path: $CERPath" -Verbose
Export-Certificate -Cert $cert.Certificate.PSPath -FilePath "$CERPath\$($cert.Certificate.Subject.TrimStart('CN=')).cer" -Type CERT -Force | Out-Null

Write-Verbose -Message 'Removing certificate from computer store' -Verbose
Remove-Item $cert.Certificate.PSPath -Force
#endregion logic

#region output
$Props = @{
    GUID = $GUID
    PWD = $PFXPwd
    PFX = "$PFXPath\$($cert.Certificate.Subject.TrimStart('CN=')).pfx"
    CER = "$CERPath\$($cert.Certificate.Subject.TrimStart('CN=')).cer"
}
New-Object -TypeName PSObject -Property $Props | Format-List
#endregion output
So what does the script do?
- At the region variables: it will generate a new GUID which will be the configuration Id (When you already have a configuration ID you can use the line $GUID = ‘your config id here’ line instead). The web enroll URL is predefined. The credentials used during web enroll will be prompted. The certificate template name (of the template you created earlier in this post) is pre-defined. The output directories have been pre-defined (I assume you run this script on the PFX website server which already contains the C:\PFXSite directory, if this is not the case you should adjust the variable). You should pre-create the C:\PublicCerts directory or modify the variable to point to a valid directory. A password is generated to secure the PFX with (you can of course overwrite variables as needed).
- At the logic region: it will first request a certificate based on the pre-defined variable entries with the configuration ID as it’s subject common name. Then it will export the certificate with the public and private key to a PFX container file which will have the name ‘configurationID.pfx’ and is protected by the earlier created password. The password is added to a text file at the PFX file location as well. Then the certificate with the public key is exported as a base64 encoded file using the name ‘configurationID.cer’ at the public cert location. The certificate is then removed from the computer container.
- At the region output: It will create a hashtable with all important data and outputs it as a custom object.
When you run the script you will get some output:

Note the GUID as you will have to use this later on when generating the configuration document and when deploying the final VM Role VM.
If you ran the script on your PFX website server, the PFX file and password text file should already be in the correct location (unless you changed the directory used for the PFX web site). In my case the PFX and DSC Pull server are the same server so my public key exported certificate is also at the correct location. I will generate the configuration documents on this server as well.
Example Configuration
Now let’s create an example configuration with sensitive data so we can later on test an end-to-end deployment.
#region variables
$Node = '2a8a4e1e-84a9-446b-ba66-38f85c924d14'
$certfile = "C:\PublicCerts\$Node.cer"
$LocalAdminCred = (Get-Credential)
#endregion variables

#region configuration
configuration LocalAdmin
{
    param
    (
        [String]$Node,

        [PSCredential]$Credential
    )
    Import-DscResource -ModuleName xCredSSP
    node $Node
    {
        User LocalAdmin
        {
            UserName = $Credential.UserName
            Ensure = 'Present'
            Password = $Credential
            Description = 'User created by DSC'
            PasswordNeverExpires = $true
            PasswordChangeNotAllowed = $true
        }

        Group Administrators
        {
            GroupName = 'Administrators'
            MembersToInclude = $Credential.UserName
            DependsOn = "[User]LocalAdmin"
        }

        xCredSSP CredSSPServer
        {
            Ensure = 'Present'
            Role = 'Server'
        }
    }
}
#endregion configuration

#region configuration data
$ConfigData = @{
    AllNodes = @(
        @{
            NodeName = $Node
            CertificateFile=$certfile
        }
    )
}
#endregion configuration data

#region logic
LocalAdmin -Node $Node `
           -OutputPath 'C:\Program Files\WindowsPowerShell\DscService\Configuration' `
           -ConfigurationData $ConfigData `
           -Credential $LocalAdminCred

New-DSCCheckSum -ConfigurationPath "C:\Program Files\WindowsPowerShell\DscService\Configuration\$Node.mof" -Force
#endregion logic
At the variables region, the configuration Id is assigned to the node variable. A path is constructed to the public certificate file and the credentials are taken which are used later on.
At the configuration region, the desired configuration is defined. In this case we want to create a local user which will be a member of the local administrator group. To create a user, a password needs to be set. This will be the sensitive data which needs to be encrypted. The configuration takes 2 parameters: Node and Credential. At the node parameter, the configuration ID will be supplied (assigned to the node variable earlier). The credential parameter takes a PowerShell credential object (assigned to the credential variable earlier) and will use the data to construct the username and password for the local account. To validate modules can be downloaded from the Pull Server, the configuration will make use of the xCredSSP resource, which is part of the DSC Resource kit, to enable CredSSP authentication at the WSMAN service level.
At the configuration data region, a hashtable will be created with the necessary data about the certificate to use for encryption. This table is later on passed to the configuration using a default available parameter ConfigurationData.
At the logic section, the configuration is called and provided with all the required parameter values / objects. The configuration document resulting from this action is stored at the configuration directory of the DSC Pull Server together with a checksum file.
The configuration document will contain something like this:
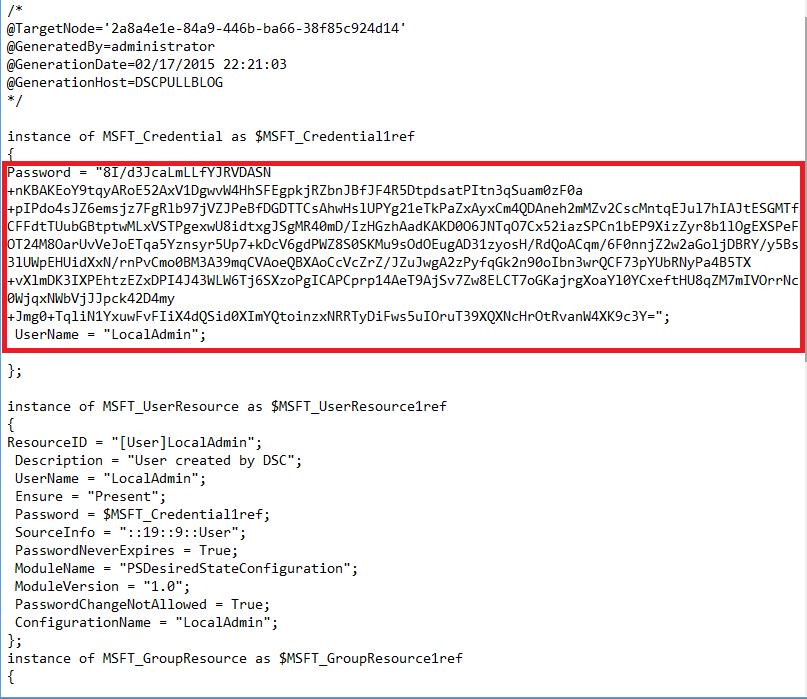
As you can see, the password section is encrypted.
So why not incorporate a domain join in this configuration? There is a resource available in the Resource Kit which can handle this right?
Yes, there is a resource for this and a domain join would be the most practical example I would come up with as well. But….
The xComputer DSC resource contained in the xComputerManagement module has a key parameter (mandatory) for the ComputerName. As I don’t know the ComputerName up front (the ComputerName is assigned by VMM based on the name range provided in the resource definition), I cannot generate a configuration file up front. I could deploy a VM Role with just 1 instance containing a ComputerName which was pre-defined and used in a configuration document but this scenario is very inflexible and undesirable. In a later post in this series I will show you how to create a DSC Resource yourself to handle the domain join without the ComputerName to be known up front.
That’s it for this post. Next we will finalize the VM Role resource extension and definition.